1. life
- 下面不是图,是运行在网页内wx demo
- 拖拉Nav窗口显示全部菜单
- File菜单只能new,quit就傻了,其他缺东西报错
- 差不多这样子,没preload任何文件,还行,能为全平台app搞点东西
小游戏刚出来时,因为跑不起太炫的效果,常被人认为low。但是如果我们知道每个用户的成本,就会发现小游戏可以以更低成本把游戏推向我们的用户,低得让人没法拒绝。随着手机硬件性能的提升和Unity/微信这等行业巨头做的努力,小游戏优化后运行3D的MMO也没什么问题。
另一方面,很多的互联网产品都面临着流量变现的压力,比如有道云笔记免费用户突然只能支持两个终端,虽然影响不大,但我能感受到其中的无奈。
我的想法是,何不接入小游戏试试?正是看到这里大有可为,借着项目接入支付宝小游戏的机会,我对Unity的WebGL技术方案的接入方式做了研究,基本能跑进游戏,对APP怎么接入Unity WebGL也有了基本了解。这里做个总结,希望优秀的APP能活得更好,优秀的游戏渗透得更快。
此文均为我一家之言,个人理解难免有误,欢迎斧正。
具体介绍请参考Unity官方引擎底层架构技术主管赵亮在2023年中Unity开放日上的分享:Unity小游戏开发简介(<-没找到官方的链接,这个是腾讯网的)。分享讲到了Unity小游戏的现状,两个方案的优缺点,优化方法和未来的技术发展方向,高屋建瓴,值得一读。
本文仅涉及WebGL方案,文章里面提到的未来的WebGPU也是基于Web标准规范的,可以认为是WebGL方案的延续,其中的变化仅限于Canvas的Context和相关接口。
WebGL方案的限制,或者说是浏览器的js执行环境的限制,首先,他是单线程的(先不讨论Web worker,单线程模式在可预见的未来都是要支持的),意味着Unity的执行不能独占执行的上下文,执行完得释放,也不能自发地触发执行。他就像一个黑盒子,任何的操作都只能由js触发,包括帧循环,定时器,事件处理。如果我们暂停js的处理,Unity没有任何代码在执行。
由于安全的原因,js执行环境没有能力访问本地的文件系统,只能从远端下载,只是如果浏览器发现有Cache且有效,会直接返回。这是很大的限制,游戏内目光所及,均是从文件加载(有纯shader实现的动画,比如这个,shader的初始化会卡1分钟,这样做不了游戏)。
所以可以想象,Unity在移植整套方案到WebGL的时候做了大量的工作,同时也暴露了很多实现到JS层,只要编译输出Debug版本,就能得到一份可读的JS中间层代码,给APP接入小游戏带来便利。以此为基础,我们可以分析App小游戏的接入,需要哪些组件,也可以自行分析出错的原因是什么。
block-beta
columns 1
  U["Unity Engine and upper"]
  block:Mandatory
    Canvas["webgl Context Canvas"]

    VirtualFileSystem
    http["HTTP Event System"]
    WebAudio
  end
上图是我个人理解,VirtualFileSystem提供的各种资源(assets),HTTP的事件系统提供玩家操作输入,经过Unity引擎和上层逻辑的处理,输出渲染结果到webgl的Canvas和播放音频。
下面会基于一个空工程的debug版js代码,回答下面几个问题
示例代码由Unity2022.3.xx导出,部分输出文件名随输出目录改变,示例代码的输出目录为webgl。
部分文件名随输出目录改变,本文以webgl为例。
| 文件 | 用途 |
|---|---|
| index.html | 包含Canvas定义,渲染输出;脚本网页入口(相当于main函数入口) |
| TemplateData/ | 网页模板资源,游戏主要是Canvas,网页上的资源没有也不影响,不重要 |
| Build/webgl.loader.js | 加载framework.js, webgl.data, |
| Build/webgl.framework.js | 加载/桥接wasm,有一js内存文件系统,事件转发,音频 |
| Build/webgl.data | 打包Bundle外的数据文件,应该都在这里了 |
| Build/webgl.wasm | 引擎+C#逻辑, 优化参考微信小游戏和相关文档,太专业了,无出其右,对着做就行 |
空的工程包含这些文件,就是Unity打包出来的全局的数据。之前折腾过Android的热更,知道这是对应asset/bin/Data下的子集,webgl版本没这方面的需求,没太关注这些文件。
下面会按启动流程,过一遍JS的源代码。帧循环的启动,操作响应事件的注册都在这里面,本章节开始的几个问题,就不另外再说了。
小游戏页面的加载从index.html开始,以拿到unityInstance结束,之后unity的帧循环开启。
index.html很简单,分为两部分:
把啰嗦的部分去掉,html部分必须的只有canvas,游戏渲染输出必备,至少支持webgl Context(其他两种是2d和webgl2,2d不行,webgl2更新一些,后续还有webgpu,技术的更新还是很快的)。
js部分也可以分成两部分,代码不多,这里直接贴代码:
配置
1 | var buildUrl = "Build"; |
默认的配置看上去只是些很常规的配置,不能做太多的东西。其实这里面大有乾坤,配置的属性和值会被一项一项地复制到unityInstance的底层framework,能够开关功能甚至覆盖实现逻辑,留意相关的注释,比如
1 | // To lower canvas resolution on mobile devices to gain some |
加载启动脚本, 构造出unityInstance就ok了。这里的unityInstance是js和Unity c#逻辑层交互的关键,一般一个页面就一个,全局存一下。如果有多个(同个页面同时操控多个游戏实例,实在想不出应用的场景),可以拿key在全局变量存一下。Unity的加载脚本都是createElement的方式加载到全局作用域,import的方式得自己改改。
1 | var script = document.createElement("script"); |
loader.js全局定义了一个大方法:createUnityInstance,其他的林林总总都在这里面,index.html传入canvas和config,异步拿到unityInstance。文件前面定义大量函数和逻辑,入口在最后面。
前面的函数和逻辑有几个重要的变量:
Module, 后面的framework会以此变量去做初始化,初始化好后,这个变量就是framework。
config的转移,此前的Module定义的方法,可以在这里直接override,此后Unity也预留了一些判断,可以改变一些行为。
1 | for (var parameter in config) |
unityInstance本身,常用的主要是给C#发消息的SendMessage,Unity的iOS/Android等各个平台都有,用过的看名字就知道。
1 | var unityInstance = { |
Module.SystemInfo,系统信息。
最后loadBuild开始加载framework和data,进度从0开始,成功后以1结束
1 | return new Promise(function (resolve, reject) { |
按图索骥,最后的loadBuild定义如下:
1 | function loadBuild() { |
上半部分异步加载webgl.framework.js,拿到初始化函数,传入Module初始化。
后半部分preRun加载webgl.data,解析,构造内存文件。为什么要放preRun里面呢,因为前面的framework下载和初始化是异步的,内存文件系统是还没初始化好。
webgl.framework.js代码量很大,除了各种辅助类的接口外,大体有下面几大块:
web的音频定义很复杂,在我调试的这段时间(2023年),还碰到Safari内存泄漏的问题,虽然后续版本有修复,但总体来说各个移动平台的web音频缓存对游戏来说,不太适应,表现为占用内存偏大,缓存释放不及时。
游戏中的音频虽然播放量大,杂,既有长的背景音,也有短的各种音效,但是播放的需求很简单,就是循环播放背景音+单次播放音效实例,复杂一点再调调各自音量,再复杂一点限制同一实例的个数。所以接入各个app原生的audio接口不复杂(我曾经想找一个audio context的polyfill工程,接上小游戏的audio接口,后来发现太复杂,不如直接接),接入后在Unity的原生音频就没用了,可以在设置里把Unity的音频给关了,再把这块代码裁剪掉。
文件系统应该是emcripten的实现,非常轻巧,值得一读,原来内存文件系统可以这么做。
其中IDBFS会被用于存放持久化文件,没有用到IDBFS的太多特性。以DB存文件不算完美,纯属没其他办法的办法。Unity在初始化时预留了个扩展(如下),可以在配置里定义一个unityFileSystemInit方法,依葫芦画瓢把文件存其他地方(取代IDBFS);或者就定义一个空方法,把PlayerPrefs数据存服务器。
1 | // Initialize the IndexedDB based file system. Module['unityFileSystemInit'] allows |
封装Canvas webgl Context的操作。
下面的代码太多,只能上图把关键的函数列出来:
flowchart TD
    createWasm --> instantiateAsync
    instantiateAsync -->D1{!FileURL and 支持流式实例化?}
    D1--> |Y| F1[fetch] --> WebAssembly.instantiateStreaming --> receiveInstantiationResult

    D1--> |N| instantiateArrayBuffer  --> getBinaryPromise --> D2{FileURL?}
        D2--> |Y| readAsync --> getBinary
        D2--> |N| F2[fetch] --> getBinary --> WebAssembly.instantiate --> receiveInstantiationResult

    receiveInstantiationResult  --> receiveInstance  --> Init[Module.asm=...\n wasmMemory=...\n Module.asm.__wasm_call_ctors on init]
初始化后得到asm,再用createExportWrapper将asm的符号导出到Module变量,之后看到的_xxx函数基本都是wasm里的xxx,如_main即wasm里的main函数,作为这些后,静待游戏启动。
帧循环的相关数据结构为Browser.mainLoop,其启动比Unity内部帧循环早,帧号比Unity C#的帧号大。
flowchart TD
    Module.preInit --> D1{config.noInitialRun?} --> |N| run --> preRun --> doRun --> initRuntime --> preMain --> callMain --> wasm.main --> _emscripten_set_main_loop --> setMainLoop --> init[init   Browser.mainLoop.runner] --> D2{fps>0}
    D2 --> |Y| timeout[_emscripten_set_main_loop_timing EM_TIMING_SETTIMEOUT] --> Browser.mainLoop.scheduler
    D2 --> |N| raf[_emscripten_set_main_loop_timing EM_TIMING_RAF] --> Browser.mainLoop.scheduler
C#里的帧循环函数在main函数执行时传入,存在Browser.mainLoop.runner里。Browser.mainLoop.scheduler即启动下一帧的更新,如果定帧,则用浏览器的timeout函数触发下一帧更新;否则,则用浏览器的requestAnimationFrame触发下一帧更新。无论怎样,下一帧更新浏览器都会调用Browser.mainLoop.runner,在Browser.mainLoop.runner里,会调用wasm传入的main_loop方法,然后再Browser.mainLoop.scheduler,如此反复,帧循环就跑起来了。
flowchart TD
    callMain --> wasm.main --> wasm.InputInit --> _emscripten_set_xxx_callback_on_thread --> registerXXXEventCallback --> JSEvents.registerOrRemoveHandler --> event.target.addEventListener
事件处理也是在main初始化时,将相关处理函数注册到js层,通过JSEvents统一向浏览器注册事件,各层均有回调,事件发生时,顺着回调函数,调回C#。调回c#时,会构造buffer作为事件参数传入。
小游戏的接入,先接入一遍微信小游戏,虽然微信重写了一遍JS部分代码,但是仍能站在巨人肩膀上,少走很多弯路。
参考Unity必选和可选组件,也感谢开源社区,Github上有大量的替代组件,可行性的问题解决后,后其他的问题应该都是工作量的问题。
全部写完,其实也只写了个大概,希望能把脉络给展现出来,方便读者深入进去。
TL;DR
https://github.com/noodle1983/llvm-ADT
栈上容器,其实也不太对,他其实是指预分配内存的一类容器,只是他通常作为临时变量在函数内使用,编译期就确定了大小,构造时不使用堆内存(new/malloc),直接在栈上构建,随函数退出析构。大概的实现:
1 | class XXX{ |
这样就比较好理解下面这句的内存分配了。
1 | void hello_world(){ |
这种情况也比较好理解:作为一个字段放在另外一个对象里去new一个对象,这段内存就不在栈上了。
1 | class ABC{ |
如果大小超过了预分配内存,会如何?如果超过了,会退化成std相应容器。
std平替容器
| std | 栈容器 | 补充说明 |
|---|---|---|
| std::vector | llvm::SmallVector | |
| std::string | llvm::SmallString | |
| std::set | llvm::SmallDenseSet | 对象个数限制2的n次幂 |
| std::map | llvm::SmallDenseMap | 对象个数限制2的n次幂 |
2的n次幂的限制源于key的hash取Bucket index的Mask,改成mod应该能把他去掉,因为如果元素hash mask后是散列的,那么取余也是散列的。改了之后理论上会慢一点(但大多数时候不需要计较的那种)。我用的地方只有几处,没改。
源码在llvm的ADT目录下, 和llvm其他代码有耦合。
我把他做了剥离,参见https://github.com/noodle1983/llvm-ADT,Linux/Windows测试和使用没什么问题。
源码里除了栈上容器,还有其他的一些bit容器,稀疏容器等好东西,我没用的上。
用法参考源码里面的unittest,可以打开VS工程下个断点看看,Linux我直接集成进游戏工程了,没去折腾unittest。
吹牛B时间。
我对它的认识还是刚毕业在爱立信的时候,做的第一个项目是基于Sun Solaris的,这个操作系统各方面的文档超全。在工作之余,一边读文档,一边拿项目做实验。印象很深的一个,是统计各个函数的总耗时,看看哪个函数比较耗,看看有什么改进的。结果出乎我的意料,最耗的函数,竟是std::string构造函数的内存分配,而且和第二名是数量级的差别。具体数据因历史久远就不可考了(当时的内存分配器比较弱,线程级的分配器因为有bug没开,估计加剧了这种差异),只是这个项目是一个电信的计费网关,没有密集的字符串处理,最多就是写日志和话单,所以当时印象深刻,却又束手无策,就惦记上了。
在爱立信的第二个项目,一个http网关,我神奇地发现,项目自己实现了一个MyString对象,预分配的64字节的空间,超出后退化为std::string。使用过程中发现,栈上这么一个MyString对象,64字节就在栈上,大部分时候,字符串都很短小,因此不会像堆申请任何内存,随着函数的退出,栈的弹出,自然就析构释放了,十分的精巧。
之后几年线程级内存分配器很快成熟,这块的消耗好像也不算什么了。仅在广州西山居的服务器后台见到,有种似曾相识的感觉。
辗转到游雁游戏,后端用着一个纯c++的游戏服务器,没带任何的内存检查设施,遂开发环境挂上Address Sanitizer。不出意料,卡。100毫秒的掉帧监控发现内存分配和释放都卡,尤其是释放有一个校验内存合法性的循环十分卡。本着有困难要上,没有困难创造困难也要上的精神,想先把大量的临时字符串内存用预分配的方法去掉。再本着别人有,就不用自己做的精神在Google/Github上搜。确实有一个SmallString,再朔源,发现是llvm的ADT(advanced data type)的单个文件剥离版。那段时间刚好在centos6上编译了最新的llvm,一看源码,我就乐了,不单止string有SmallString,vector/set/map都有相应的实现,和之前在爱立信看到的思路一样,超了就退化到std库,比较灵活的一点是预分配元素的个数可以通过模板参数提供。当然,还有其他的侵入式容器,bit相关容器等。
好东西,只是这个库依赖于llvm的其他组件,遂做移植,裁剪,linux/windows下可用。
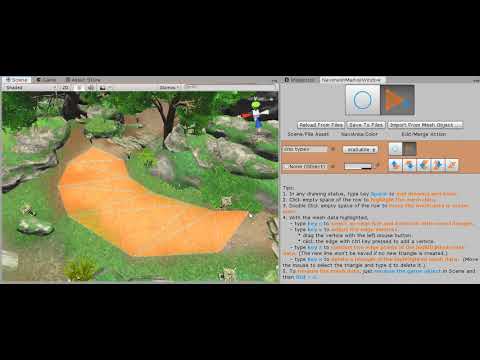
It is useful to bake meshes into a NavMesh file in Unity. As the project turns large, the meshes can be too complex to match a navigation area. And the longer I work with it, the stronger feelings I have would be if
So I make NavimeshMarker. NavimeshMarker is a Unity Editor tool that aims to
After the meshes are generated, you can follow the old workflow to bake it to the navmesh data in the Unity Navigation Panel. And the navmesh data, instead of the meshes, is utilized at runtime eventually. And the meshes won’t be saved with the scene. Instead, they are saved as files in a directory besides the scene file. And it needn’t be packed into the game, which will save the memory at runtime.
Or you can also export the navmesh without the baking workflow. The meshes intersection and the union calculation will be performed(The source code of this part is in secret.) during the exportation and the edge vertices are kept. Then the data will be saved in JSON format and transferred to the Detour format. An example is provided to show how to use these data in Unity. And it can be used anywhere as it is written in C++. The exporting and the runtime source are available via this link(I only add new files and nothing changes are made to the original source, so it is easy to rebase.). In this workflow, you must pack the runtime data into the release package.
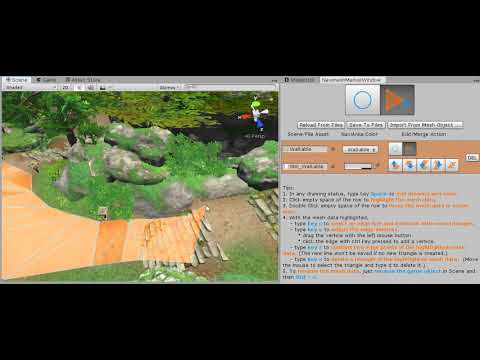
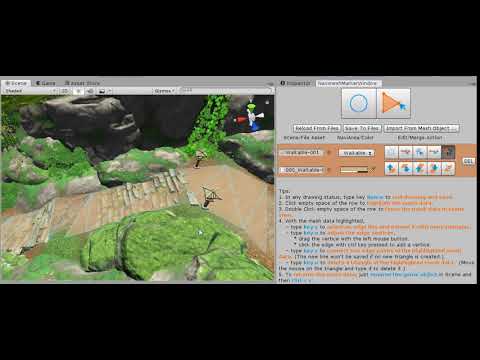
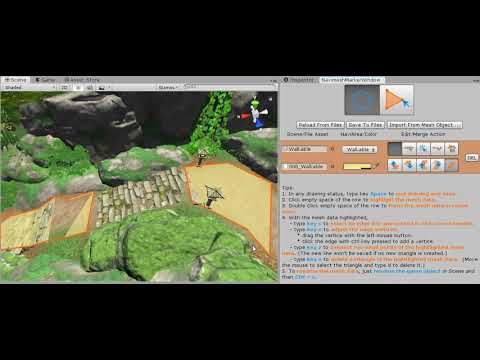
As an editor tool, an editor window is made to manage the meshes’ data. The features are as followed.
The details come as follows.
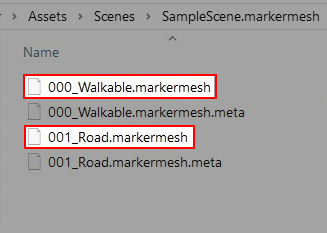
As described above, the meshes data is saved in the same directory as the Unity scene file(*.unity), with the same name as the scene name and the fixed postfix .markermesh.
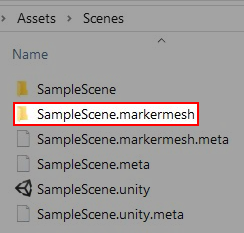
And the mesh files are named sequentially and stored in JSON format. For short, these mesh data are named markermesh below.
When a scene is loaded, nothing is changed to the scene in the hierarchy until you open the NavimeshMarker Editor Window via Window -> NavimeshMarkerWindow. Then, a gameobject named EditorOnly-WontSaved-MarkerMeshManager is added to the scene. The markermesh is loaded as sub-game objects with a MeshRenderer component attached to each of them, so the markermesh can be shown in the scene. The gameobject EditorOnly-WontSaved-MarkerMeshManager and the sub-objects are for editor only and won’t be saved in the scene. It means none of them will be included in the packed App. And it also means next time the scene is loaded in the editor, you have to open the NavimeshMarker Editor Window to show the markermesh in the Scene Window.
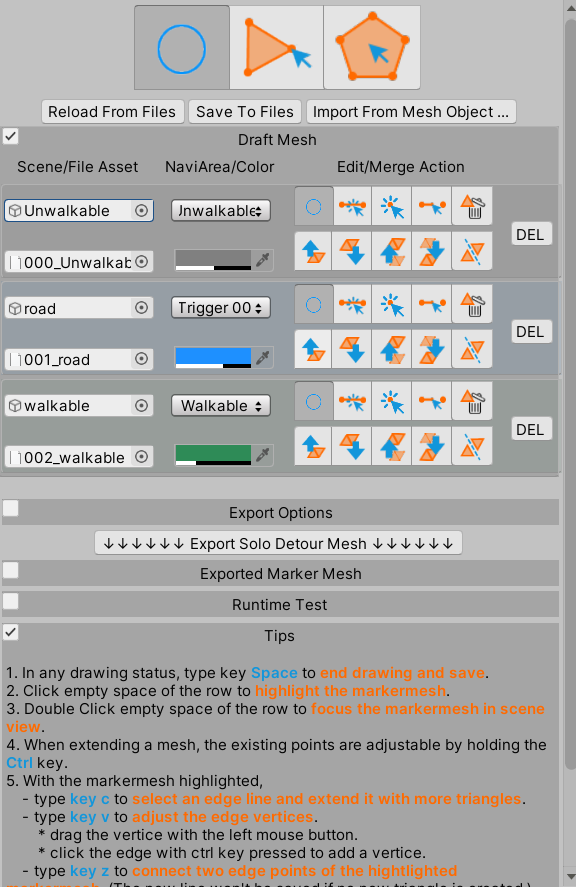
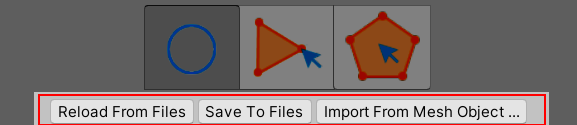
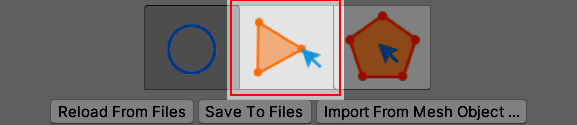
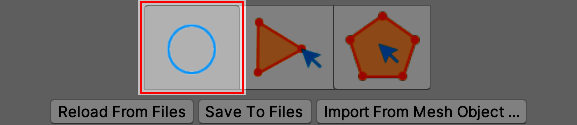
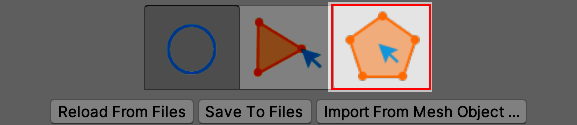
In the NavimeshMarker Editor Window, there are 2 buttons named Reload From Files and Save To Files. Automatically, the data is loaded when the window is shown and is saved when you complete the editing jobs or the scene is saved. Still, these jobs can be done manually via the 2 buttons. With another button named Import From Mesh Object…, a normal mesh can be imported from the asset or the scene.
The .markermesh files are in JSON format. And it is best to manage them with your revision control system(svn/git/…). Other than that, you don’t need to care about the storage too much, it has no impact on the scene data.
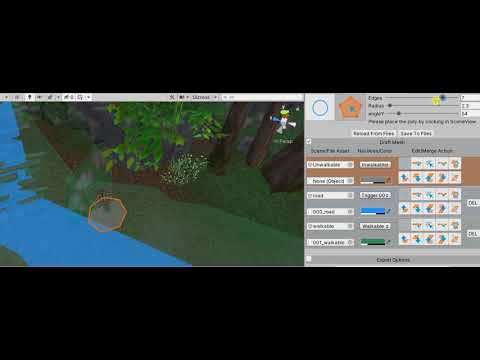
By clicking the Markermesh Creation button, as shown above, you will start to mark a new area. The steps are as follows.
And some tips come as follows.
Here comes the video demonstration.
Video 1. To Create A Mesh
By clicking the Regular Poly Creation button as shown above, you will start to create a new regular poly marked as Unwalkable area.

Once you clicked the button, the parameters are shown. You can adjust the edges, the radius, and the rotation on the Y-axis.
Here comes the video demonstration.
Video 2. To Create A Regular Poly

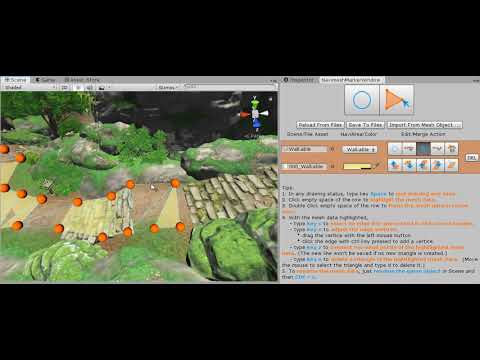
By clicking the Extension button as shown above, or type key c, you will start to extend an existing mesh.
Here comes the video demonstration.
Video 3. To Select An Edge Line To Continue

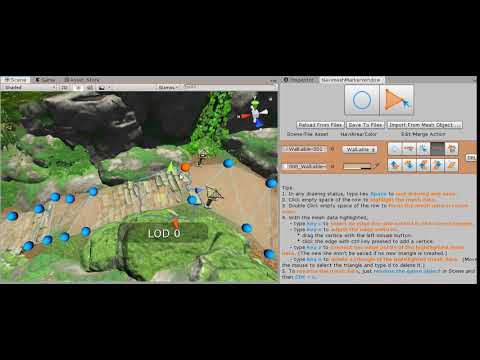
By clicking the Edge Vertices Adjustment button as shown above or type key v, you will start to adjust the edge vertices slightly.
Here comes the video demonstration.
Video 4. To Adjust Edge Vertices’ Position

By clicking the Connecting Edge Vertices button as shown above, or type key z, you will start to connect two edge points of the highlighted mesh data.
Video 5. To Connect Edge Vertices

By clicking the Triangle Deletion button as shown above, or type key x, you will start to delete an existing triangle.
Video 6. To Delete Triangles

By clicking the merge button, the markermesh will be merged to its upper/lower.
If the 2 markermeshes are not next to each other, please move them with the move button described in Chapter 4.2.

By clicking the split mesh data button, the markermesh will be split into several not connecting pieces.
If all the vertices of the mesh triangles are connected, nothing will happen.
Video 7. To Merge and Split Meshes
Here comes the video demonstration.
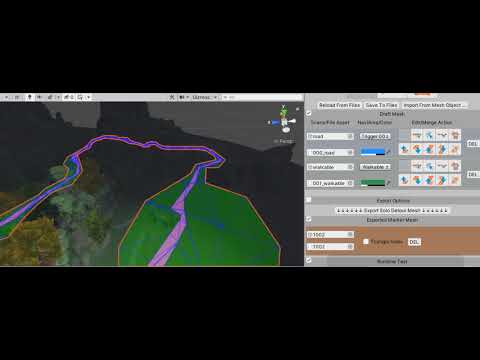
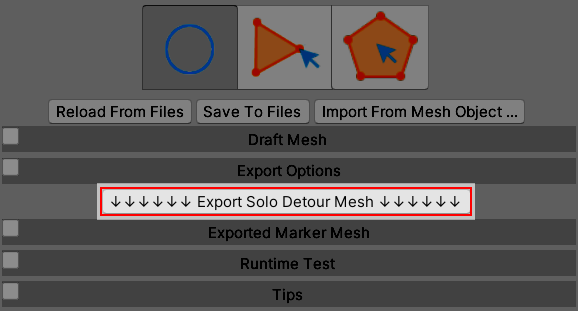
Video 8. To Export Detour Mesh
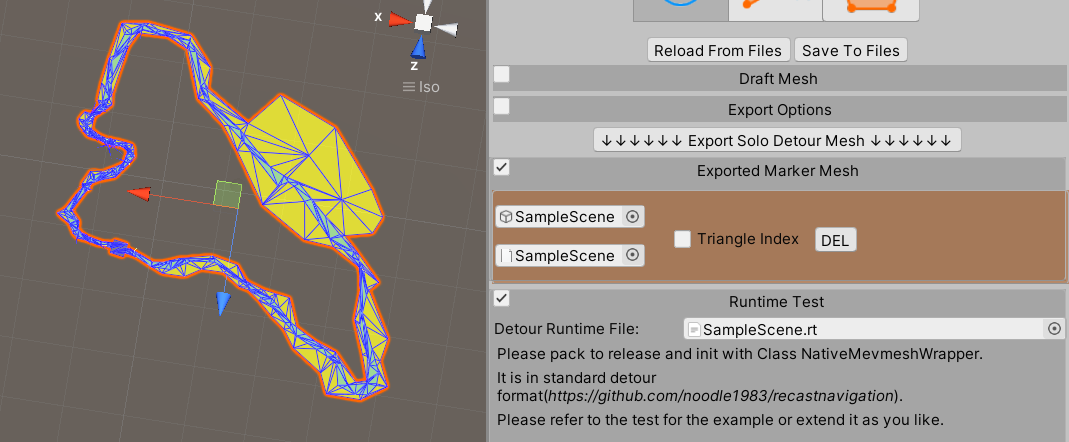
After the exportation is completed, the detour runtime file is generated from the final mesh too.
The examples will show how to use the detour format data.
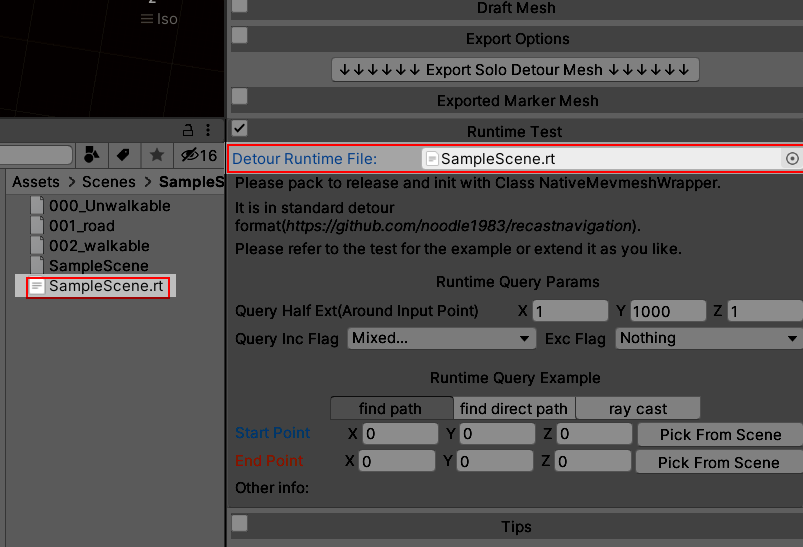
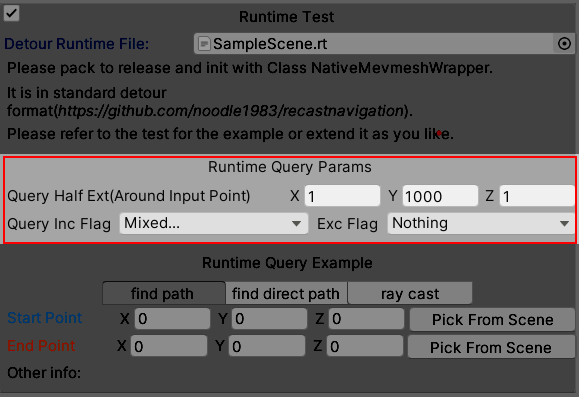
You can adjust the parameters as above during the test. Please refer to the Recast Doc for the usages of the parameters.

There are 3 examples, which are find path, find direct path, and raycast. The find path will show the path from the start point to the endpoint. It may contain some mid-points which look not so straight. So the find direct path does more calculation basing on the find path to make it look more straight. Please refer to the video for how to set the start point and the endpoint.

Video 9. Runtime Query Example
1 | //For the bake workflow |
1 | auto navmesh = NativeNavmeshWrapper.NewInstance(detourBinPath); |
This is the readme file for rzsz-nd .
As well-known, lrzsz is a very handy tool to transfer files along with the existing terminal. It is so convenient that after I implemented the ZMODEM feature in putty-nd, I seldom use other tools to transfer files.
Then, why do I make another implementation of it? Well, as a user, I have a lot of thinking, like what if it can blablabla or why can’t it be blablabla. Those thinking keep following me and someday I couldn’t stand for it and downloaded its source code. Sadly I gave up before I got drowned in the source code(Sorry to say that, it is my problem). And the worst thing is, this happened again and again. To get out of this dilemma, I decide to re-implement it again.
I have some tools on hand, the FSM and the multi-jobs Processor in C++. So it is written in C++. I have written build scripts in plain Makefile, so it is not autoconf. It is a utility tool, which means it must not occupy lots of resources from the other logical server. So it is a single thread.
As it is a long time after the ZMODEM protocol was invented, rzsz-nd starts from a basic feature, which is sending/receiving plain file in ZMODEM, without any conversion and encryption. For the other features in ZMODEM or YMODEM/XMODEM, will be gone with the wind if no one bring it back in the future. I have implemented some more features and protocol extensions, which are detailed in the following chapter.
The original ZMODEM protocol is available via the link or the markdown version. And the simple workflow comes follows.
sequenceDiagram
participant client
participant server
server->>client: ZRQINIT
client->>server: ZRINIT
server->>client: ZFILE
client->>server: ZRPOS

server->>client: ZDATA(ZCRCG... ZCRCE)
server->>client: ZEOF
client->>server: ZRINIT

server->>client: FIN
client->>server: FIN
sequenceDiagram
participant client
participant server
server->>client: ZRINIT
client->>server: ZFILE
server->>client: ZRPOS
client->>server: ZDATA(ZCRCG... ZCRCE)
client->>server: ZEOF
server->>client: ZRINIT
client->>server: ZCOMPL
client->>server: FIN
server->>client: FIN
The feature is already supported in the ZMODEM protocol. I just send the relative path of the file as its filename. The server/client check the ‘/‘ character and make the directory. However, the empty directory is ignored at the moment.
sequenceDiagram
participant client
participant server
server->>client: ZRQINIT
loop each file
    client->>server: ZRINIT
    server->>client: ZFILE
    client->>server: ZRPOS

    server->>client: ZDATA(ZCRCG... ZCRCE)
    server->>client: ZEOF
end
server->>client: FIN
client->>server: FIN
sequenceDiagram
participant client
participant server
server->>client: ZRINIT
loop each file
    client->>server: ZFILE
    server->>client: ZRPOS
    client->>server: ZDATA(ZCRCG... ZCRCE)
    client->>server: ZEOF
    server->>client: ZRINIT
end
client->>server: ZCOMPL
client->>server: FIN
server->>client: FIN
The file cursor position in ZMODEM protocol message(ZRPOS/ZDATA/ZACK/ZEOF) is defined as 4 bytes, which limits the file size max to 4 GB. In order to achieve this feature, a 64bit binary frame with CRC32 is defined. When the cursor position is larger than 4 GB, the 64bit binary frame will be used while the rest is as it was.
1 | #define ZBIN64 'D' |
2 extra messages ZCOMMAND(ZCOMMAND_CHECK_LEN) and ZACK(pos) are involved.
sequenceDiagram
participant client
participant server
server->>client: ZRQINIT
client->>server: ZRINIT
server->>client: ZFILE

opt file exist on client
    Note left of client: calc the CRC32 of the existing the file content.
    client->>server: ZCOMMAND_CHECK_LEN(CRC32, len)
    Note right of server: verify the CRC32 of the file heading content in len length. ack with the same length if ok, otherwise 0.
    server->>client: ZACK(len)
end
Note left of client: start transmitting at the responsed length or 0.
client->>server: ZRPOS(len)
server->>client: ZDATA(ZCRCG... ZCRCE)
server->>client: ZEOF
client->>server: ZRINIT
server->>client: FIN
client->>server: FIN
sequenceDiagram
participant client
participant server
server->>client: ZRINIT
client->>server: ZFILE
opt file exist on client
    Note right of server: calc the CRC32 of the existing the file content.
    server->>client: ZCOMMAND_CHECK_LEN

    Note left of client: verify the CRC32 of the file heading content in len length. ack with the same length if ok, otherwise 0.
    client->>server: ZACK(len)
end
Note right of server: start transmitting at the responsed length or 0.
server->>client: ZRPOS(len)
client->>server: ZDATA(ZCRCG... ZCRCE)
client->>server: ZEOF
server->>client: ZRINIT
client->>server: ZCOMPL
client->>server: FIN
server->>client: FIN
The options are added to update client/server working direction, and preset the rz files to avoid the file selection. Please refer to the usage chapter for the details.
Type make to build release version. And make install to install it to /usr/local/bin.
1 | make |
Type make debug to build a debug version.
1 | make debug |
1 | [ludong@VM-0-17-centos rzsz-nd]$ ./sz --help |
1 | [ludong@VM-0-17-centos rzsz-nd]$ ./rz --help |
Except for extra permissions from Dong Lu(noodle1983@126.com), this software is released under version 3 of the GNU General Public License (GPLv3).
| module | license |
|---|---|
| tclap | MIT License |
缺失模块。
1、请确保node版本大于6.2
2、在博客根目录(注意不是yilia根目录)执行以下命令:
npm i hexo-generator-json-content --save
3、在根目录_config.yml里添加配置:
  jsonContent:
    meta: false
    pages: false
    posts:
      title: true
      date: true
      path: true
      text: false
      raw: false
      content: false
      slug: false
      updated: false
      comments: false
      link: false
      permalink: false
      excerpt: false
      categories: false
      tags: true